Showing posts with label crafts. Show all posts

Tuesday, August 20, 2013

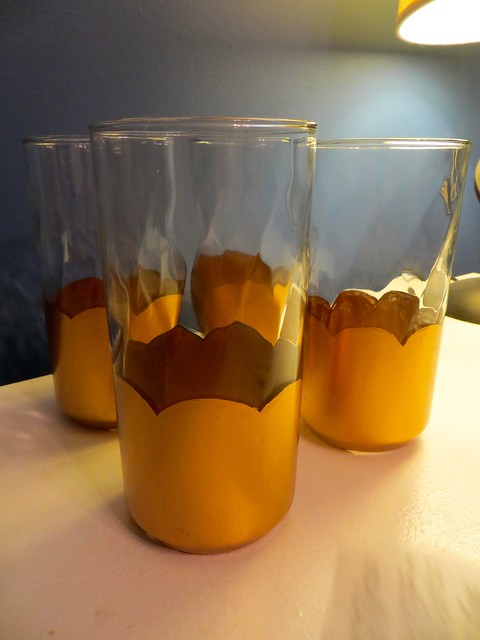
DIY: Gilded Glasses

gilded glasses


My friend Hillary also has an August birthday. While doing reconaissance on her Pinterest for gift ideas, I saw a really cool tumbler glass with gold leafing, ending in a scalloped edge. It had a price to match its decadent look, but I knew instantly that I could DIY a similar set of glasses!

This glass painting tutorial had some helpful tips, but as it turned out, I didn't really need them. What confused me was the gold leafing process. So in lieu of actual gold leafing that would probably flake off of the glasses every time they were washed, I decided to use a gold leafing paint and an acrylic sealant, both of which I found at Michaels.

Once I had my paints and set of four simple tumbler glasses, I wrapped a flexible scallop border template (the same one I used to make these scalloped shorts) around the outside of each glass, about halfway up. Then I traced the border with a grease pencil. If you can, I recommend using a pencil close to the color of your paint - I didn't, and it was visible inside the glass (though not very noticeable). I didn't worry too much about a totally straight edge or making the scallops uniform. I thought a little imperfection would be good for the overall look.

With a standard artist's paintbrush, I "cut in" the scalloped edge freehand, then filled in the bottom part of the glass with the gold leaf paint. I was so happy and impressed with how it looked after just one coat, I didn't add extra layers, but for future projects I'll experiment with a thicker or more textured finish. After letting the paint dry on all four glasses, I applied the sealant using the same process. I'm not even sure if the sealant was necessary, but it can't hurt.

These glasses would also be great for holding small flower arrangements or tall candles. I had such a good time painting them that I plan to make some for myself (and maybe other friends if they're interested). Hillary loved them and said they looked like they could have come from Anthropologie. Mission accomplished!! :)

Friday, June 14, 2013

Polka Dot Tablecloth


Another project I tackled on my recent crafting spree is this DIY polka dot tablecloth from Oh Happy Day! I don't usually cover my dining table, but this simple design really spoke to me. I bought a $10 tan tablecloth at Burlington, then spread it over a tarp in my garage and stamped the dots on, freehand, with the roundest sweet potato I could find at Easy-Way. It took about an hour. I absolutely LOVE the finished product! It was just what my dining room needed - a little visual interest without a lot of loud colors. I also like that all the dots are slightly different and imperfect. (My dad thinks they look like MRIs of a healthy brain. LOL.) The same technique on placemats could be a fun summer craft for kids. You could carve the potato stamp into any shape you want.

If you try this, be warned that the potato will drink up a LOT of paint. I started with one bottle of Tulip matte white fabric paint. Ha ha! It lasted for four rows of dots. So the project halted for several days while I fruitlessly searched for more of the same kind, eventually switching to a generic all-media craft paint. Thankfully, you can't tell a difference between the two paints. In the meantime, I kept the potato in the fridge so it wouldn't rot, and it absorbed a lot less paint on the second go-round. Good to know for the future.

Happy Friday!

Monday, June 3, 2013

Craft and Garden Update

I've had a crafty few weeks. Here are some things I've made!

IMG_0423


Because I seem to need front-door decor for every month of the year, I made this cute semi-patriotic wreath based on this tutorial. The wreath in the original post is burlap wrapped around a foam or straw core. However, on the day I made this, I didn't have time to go to multiple stores. So you're looking at a twig wreath form wrapped in burlap-look upholstery fabric from the Garden Ridge $1.50 remnant bin. I wrapped it around and secured it with hot glue. It's not as picture-perfect as the original, but it works for me!

If you just want to learn how to make the felt hydrangeas, that tutorial is here. Felt flowers have become my go-to. They aren't trying (and failing) to look like real flowers, and they're cute, cheap, and easy to make.


tablerunner1


Since I got my sewing machine, most of my projects have proceeded as follows:

- Pin a bunch of tutorials for what I want to make
- Settle on one; buy and prepare supplies
- Read tutorial thoroughly and discover that it's too confusing or labor-intensive; try another
- Repeat several times
- Panic because I don't have adequate supplies for other tutorials
- Finally, choose whatever I can understand that won't require me to go back to the store

Making a new table runner for the console table in my living room was no different. I had pictured something more complicated, with a border, but ended up using this Simple Table Runner Tutorial from Cloud 9 Fabrics. It's a clean, basic reversible design – all you have to do is sew with wrong sides together, pull right side out, and topstitch it. Very manageable! Even so, it took me at least two hours to create this large rectangle. I'm ready for my McCall's Sewer of the Year award now.

My old table runner was brown, and too dark once I got hardwood floors. So it makes me happy to see this cheery design. The fabric is from the outdoor section at Hancock. I topstitched with blue thread to make it more interesting.


tablerunner2


Finally, here are my tomatoes after TWO WEEKS:


Again: TWO WEEKS. I even checked the calendar to make sure it hadn't been longer since planting day… and it was a late planting at that. Wholly Cow indeed!! The tomatoes aren't the only plants taking off. I can practically see the cucumber vines growing, and something has shot up next to them that's not a cucumber. Possibly one of my watermelons from last year! It's all very exciting… for me and my dad.  :)  Looks like I need to learn to can for real!

My battle with birdseed-thieving squirrels has been well documented on this blog. Yesterday my dad provided me with a new weapon that may end the backyard war forever:


This feeder is weight calibrated for birds, so if squirrels land on the ledge, it closes. It has a secure top that even my dexterous local squirrels can't take off. I should have gotten one of these years ago, instead of spending literally hundreds of dollars (over time) on birdseed that never made it to the birds. Victory! (I hope.)

Thursday, February 7, 2013

Making New Candles From Old Candles

As far as I'm concerned, Yankee Candles have no competition. No other affordable candles are so fragrant, with such great smells. I hate to toss large candles that have burned down to the bottom, but still have enough wax for a few more hours of burn time. So I needed to do something about my growing collection of mostly-empty candle jars. Naturally, I took to Pinterest, and found a layered candle tutorial with basic instructions. If you also want to try this, here's what I did!

candlemaking (1)

candlemaking (3)

You will need:
Old candles with compatible fragrances (use your own judgment)
Candle wicking, and metal wick clamps if needed (available at Hobby Lobby and other craft stores)
A pencil or something to hold up the wick
A new container for the new candle

Bring a large pot of water to a boil. The water should be around the level of the wax, but obviously, not high enough to overflow the candle jar. When the water is boiling, place a jar into the pot. Start with the one that has the most wax in it (I didn't think about this ahead of time). Leave it in the boiling water until the wax has fully melted inside the jar. Your time will vary, but it probably won't take more than five minutes. It's safe to do this - as long as your jar started at room temperature, it will not explode in the pot. I looked it up!

Meanwhile, prepare your new candle jar. It should be smaller than the existing one. I used a small canning jar that I already had. Cut off a length of candle wick and fasten one end to the metal wick clamp. Tie the other end of the wick to the pencil (or whatever you're using). Place the pencil across the mouth of the jar so the wick is roughly in the middle, and the wick bottom is hitting or near the bottom of the jar. It doesn't have to be perfect.

candlemaking (2)

Once your wax has melted, carefully remove the jar from the pot (use oven mitts!) and pour the melted wax into the new container. Try to keep the wick in the middle. The wax will cool while your next candle remnant is melting. The tutorial said it would be set by the time the next one had melted, but I wish I'd waited a little longer, because the final product was a little sunken in the middle. Place your next old candle in the pot, and repeat the process until your new candle container is full! Then trim the wick to your desired length. If you have pets, a pet nail clipper is perfect for this job.

candlemaking (4)

I highly recommend this reuse project. It's SO easy to do, and you can enjoy your good candles for a little longer!

Wednesday, January 23, 2013

Argyle Heart Wreath

argyle heart wreath

My wreath addiction encompasses all seasons and occasions (more evidence here, here, and here). When I saw an adorable argyle heart wreath recently on Pinterest, I couldn't resist making it. It's one of my favorite patterns and color combinations!

Materials:

argyle heart wreath

Straw wreath form (heads up: NEVER remove the plastic wrap)
Two colors of felt, two sheets each (I chose the recommended red and pale pink)
One skein of contrasting yarn (I chose the recommended heather gray)

My total cost was about $8 at Michaels. You also need a heart stencil and a hot glue gun, which I already had.

Directions:

Completely wrap the wreath form in the yarn. This will take some time - in my case, the duration of DVRed episodes of Bunheads and The Mindy Project. Be sure to secure the yarn, with a knot at least, at the beginning and end of wrapping.

Trace and cut out felt hearts. The number needed will depend on the sizes of your wreath and heart shape. The tutorial recommended eight hearts of each color, but I ended up with six of each color.

Hot glue the felt hearts onto the wreath, alternating colors. Make sure you like the arrangement before you start gluing!

Create the argyle pattern. This step is a little tricky. You need to attach the end of the skein of yarn somewhere on the back or inside of the wreath, then wrap one strand diagonally around the hearts, making an X over each heart. The original post provided a method for doing this, but I winged it and was able to finish without cutting the yarn and starting a new strand.

Secure the yarn, and you're done!

argyle heart wreath

I really like yarn wreaths. Not only are they cheaper and easier to make than more elaborate wreaths, but they also lay flat between my front door and storm door. It's nice to close the door without hearing the crunch of my wreath materials being crushed.

Anyway, this Valentine wreath is already displayed on my door. I don't care that it's still January. It makes me happy to look at it, and in the bleakness of January, we take any happiness we can get!

Friday, July 6, 2012

Patriotic Wreath


I hope everyone had a good Fourth! I am IN LOVE with this patriotic wreath that I made the night before - found here. I started with a cheap straw wreath from Michaels (still wrapped in plastic, which I've learned is the only way to go with straw wreaths), and wrapped it in red, white, and blue yarn. It took about half a skein of each color. I cut the stars out of white felt that I already had, and borrowed straight pins from my mom.

As I've mentioned before, I have trouble fitting multi-dimensional wreaths between my regular door and storm door, so I love that this one is flat. It looks so sharp and streamlined, and it was so easy to do. I'll probably leave it up for all of July. If we can celebrate Christmas for over a month, I don't see why I can't celebrate my country for longer than a day. :)

***

Sorry for the lack of scintillating posts lately, but life is currently a little unscheduled and unpredictable (as is common in the summer) and I'm enjoying living it. But I am still around and will eventually get back into more of a routine.

Also, if any locals might be interested in buying a Lexus RX300, let me know. So far I'm not getting any closer to that Hyundai Elantra.

Friday, September 30, 2011

Felt Roses Fall Wreath


I saw this felt flower wreath, from Little Things Bring Smiles, on Pinterest and and had to make one for myself! The original wreath used only orange flowers, but a) I didn't want the wreath to clash with my red door, b) I'm not a monochromatic kind of girl, and c) I was nervous about adorning my house with a lot of anything UT orange.

For this wreath, I bought fifteen sheets of felt at Michaels - five each of cream, orange, and brown - and a couple of sheets of green felt for good measure. I also picked up some florist wire. The bare-branch wreath was one I already had from the year before. I just removed the fake flowers I'd previously added to it. All in all, a very cheap craft.


To make the roses, I traced circles onto felt and cut them out. I used a CD and a coaster as guides, thinking that two sizes of rose would be interesting. After cutting out the circles, I cut a spiral into each one, starting from the outside.

Then I followed the instructions for rolling up the felt circles, starting at the outside of each spiral and rolling tightly. I secured the end of each rose with hot glue. Once all the roses were complete, I cut a few inches of florist wire for each one and pushed it through the hole in the center of the rose, making a small hook at the top of the wire to keep it from pulling through the rose. Then I stuck the wire through the branches, where I wanted the rose to go, and secured the excess wire at the back of the wreath. There's probably a better way to attach the roses to the wreath, but this way worked for me. After all the felt flowers were arranged, I cut a few leaves from the green felt and hot-glued them to the bottoms of some of the roses, wherever I thought they looked best.


This craft took several sessions to complete, and because there weren't a lot of instructions (other than those for making the flowers), I sort of made it up as I went. So it's open to interpretation if you want to make your own. I'm very happy with mine! :)

Wednesday, January 19, 2011

Thankfulness Journal

thankfuljournal2

My New Year's resolution this year was to start keeping a thankfulness journal, and so far I haven't missed a day! Every night as I'm getting into bed, I write down three things I'm thankful for that day, or three good things that happened. Sometimes I add one or two short prayer needs. Sometimes I take up a whole separate page if something is really on my mind. It's just a small thing, but it helps to focus my prayers and thoughts in a non-intimidating way. It also has unexpected side effects, such as revealing patterns. So far most of my thankfuls involve good food, spending time with people, or some new thing I bought. Sometimes all three comprise my list for the day. Should I feel bad about this? :\

thankfuljournal 1

Anyway, to work up enthusiasm for the project, I decorated this plain blank book with some baubles from Michaels. As usual, the idea came to me fully formed while I was there on a different errand. So I chose this bird and tag from the jewelry section. Maybe it's weird that I used "passion" for the cover of a thankfulness journal, but they didn't have "thankful," and "passion" is a keyword for me these days. So I went with it. I just hot-glued the charms to the front of the book. Easy!

I'm glad I'm doing this, especially now in the bleah-est bleahs of winter. If my mood has been any indication, Blue Monday was this week, not next week. I need some sunshine.

Wednesday, December 22, 2010

New Venture

2009May19

I've always enjoyed writing and wanted to Do Something with it, but for years I've been paralyzed by perfectionism and limited thinking. Now I'm really working on being open to possibilites, especially unexpected ones, in all areas of my life, including writing. My friends know this. In mid-November, Myla sent me the link to an application for a website called Blissfully Domestic, along with a note strongly encouraging me to go for it. :) In the past, I would have assumed that I was too inexperienced or not talented enough to do such a thing. But I liked the website and thought I'd fit in well there - since I am, in fact, blissfully domestic. I told myself that the worst they could do was say no, and submitted the application. I really didn't think anything would come of it, but a few weeks later, I received an e-mail telling me I was accepted!

So I am now an Arts & Crafts Columnist at Blissfully Domestic, and my first post went live today! If you're interested in making custom coasters to match your decor, it's a great time to learn how. :) I'll be posting there monthly (at least) and am very excited about this opportunity to grow as a writer - and crafter!

Wednesday, November 3, 2010

Checking it twice.

mbr2010-4

I'm in list mode this week. This is progress, because I used to LIVE in list mode. (I don't recommend it.) But as we shift into real fall, I feel the urge to take care of things and set goals. Here are some things I want to do soon or over the winter:

- Reorganize my closet and dresser drawers. Probably this weekend, when I unpack the winter clothes. I have a lot more clothes out in winter due to layering, and now I have a whole closet and room to myself, so it's time to re-evaluate how I'm using the space. I'm excited about this. Because I am an organizing nerd.

- Make a T-shirt quilt. Throughout high school, I collected Hard Rock Cafe T-shirts. I bought them everywhere I went, and my dad also picked up a few on his international travels. Now I don't wear T-shirts anymore except for exercise, so they're sitting in a box somewhere in my parents' attic. I'd like to give them a new life, rather than getting rid of them, because they have a lot of fun memories attached. I can barely sew and have never quilted at all, but it can't be too hard with my mom helping me. Tips would be appreciated, though.

- Scrapbook my high school band years. I recently evaluated whether I should keep scrapbooking at all. I really enjoy it, but in the digital age, it seems a little redundant and outdated. I decided it would be more worthwhile if I made my scrapbooks more journally - sadly, most of my books have empty journaling spaces because I could never think of the "right" thing to say. Anyway, after spending last Saturday at a marching competition with friends, I've been flooded with happy memories. I was the band historian (shocker, I know) and thus have a ton of pictures and stuff. I actually started a band book several years ago and lost interest, but it's the perfect scrapbooking topic for the moment. Only good memories, and no potential emotional landmines relating to my current circumstances. Yay!

- Home maintenance. I've never taken my lawn mower for off-season maintenance. I've never had my chimney cleaned, and it's been making weird popping noises lately. Some of my roof shingles are missing. And obviously, since I was married to a mechanic, I've never given a second thought to a car maintenance schedule. Now I have to get familiar with all those things and more. But I can do it! I'm just thankful we replaced the entire HVAC system two years ago, because that would be extremely unpleasant to deal with (and pay for) alone.

What are some of the big to-dos on your list?

Wednesday, October 27, 2010

Stopping to paint the pumpkins.

2010Oct27

Today my company had a lunchtime Fall Festival, with games and a homemade-soup contest (or free hamburgers if you didn't want soup). I had intended to eat quickly and then hurry across the lot for my usual Wednesday workout, but I dawdled around with some nice co-workers. Then, on my way out, I saw a pumpkin-painting station. The combination of pumpkins, crafts, and sunshine, in the middle of a workday, was irresistible.

Bottom line: I did not exercise today. And I'm okay with it.